![SPRII-udenR_logo-orange+dark.png]](https://help.sprii.io/hs-fs/hubfs/SPRII-udenR_logo-orange+dark.png?height=40&name=SPRII-udenR_logo-orange+dark.png)
Before you start
Sprii shows separate payment forms for a WORLDLINE card on the Bambora route and an ePay Payment Solutions card. Their credential fields differ. Use only the route that matches your supported provider account. Choose by the credential set for your account, not by the old article title.
Use an administrator account on the intended Page and set up Sprii Checkout.
Start in Sprii
Open Page settings  > Sprii checkout > Payment methods
 and choose the card matching your account. Do not use one route's credentials in the other form.
Worldline Payment form
- On the card with the WORLDLINE logo, click Configure. Sprii shows this card on its Bambora route.
- Click Activate payment
 and enter a customer-facing Title.
- Use credentials for Worldline Online Checkout Europe, not another Worldline product. In the current Online Checkout portal, open your account menu > Profile > API. If you need a new API key, choose Generate new and give it a name. Production keys require a fully onboarded company. Store the displayed secret securely; it is shown only once. Do not capture credentials in screenshots or support messages.
If your account uses merchant.bambora.com, Worldline has separate API-user instructions. Use the production merchant rather than the default test merchant; that documentation distinguishes production numbers beginning with P from test numbers beginning with T.
Keep the values from the same production API key or user together. Enter its Access Token in Sprii’s Access Token, its Merchant Number in Merchant Number, and the API Secret Token in Secret Key. Do not enter Worldline’s separate MD5 key in Secret Key. Turn Autocapture on if the full amount should be captured when payment completes; leave it off if the payment should remain authorized for later capture in Sprii.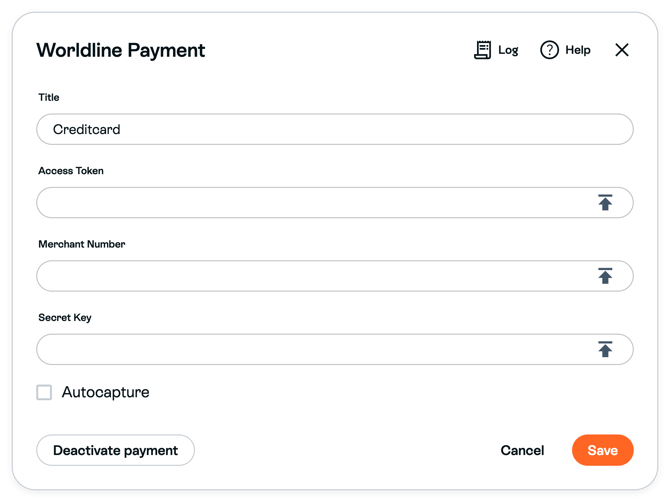
- After entering the account-specific values and choosing capture mode, click Save

ePay form
- On the card with the ePay Payment Solutions logo, click Configure. The current form heading reads ePay (Wordline).
- Click Activate payment and enter a customer-facing Title.
- For a supported classic ePay account, open its administration and keep each credential handoff separate:
- Merchant: use the production merchant number from Settings > Payment system, or from the acquirer agreement. Enter it in Sprii's Merchant field. See ePay's payment web-service reference for these administration and agreement sources.
- MD5 Key: use the secret password configured under Settings > Payment system. If no key exists, ePay describes creating it there. Enter the same secret in Sprii's MD5 Key, not a calculated MD5 hash. See ePay’s credential FAQ.
- Webservice Key: use the classic ePay API/web-service password under API/Webservice > Access; see its remote-password instructions. Enter that separate password in Sprii’s Webservice Key. Sprii sends it as the web-service password for capture and refund. It is not the MD5 key or a new REST API key. The linked provider page identifies the classic credential, not a Shopify setup procedure for Sprii.
ePay maintains separate classic documentation and new ePay documentation. Its new onboarding procedure uses a sales-site ID and API key. Do not substitute that different credential pair for the classic Merchant, MD5 Key and Webservice Key fields shown here.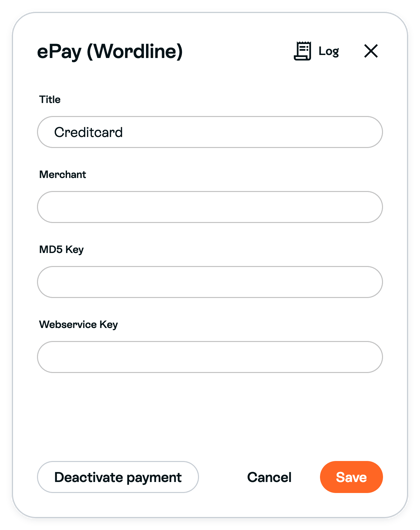
- After entering the classic ePay credentials and arranging API access as described below, click Save
Payment and domain boundaries
With Worldline Autocapture on, the full payment amount is captured when payment completes. With it off, the payment remains authorized until capture. Classic ePay authorizes the payment for later manual capture.
To capture an eligible authorized payment in Sprii, open Orders. Open the matching order by clicking its row away from the payment icon on the right. Do not use that row icon to open the order: when its tooltip says Click to capture followed by an amount, one click submits the capture immediately. In the order dialog, Capture followed by an amount appears when an amount is available to capture. Check the order and displayed amount before clicking; that button also submits capture immediately. Check the matching provider transaction before shipping.
Depending on the shipping flow, capture can also be requested when a label is created with Capture payment when label is created selected, after a Webshipper shipment, or when an order is marked handed out. Do not request capture twice for the same payment. A failed classic ePay capture may not display an error in Sprii, so verify its transaction status in ePay after capture.
If you need to inspect the payment, use the Backoffice matching your Worldline account. Capture there only as a coordinated fallback when Sprii capture cannot be used:
- reports.bambora.com: open the matching order from the top menu and inspect its order list, details and events. If a fallback capture is required, use Capture on that payment. See Worldline’s order-handling instructions.
- merchant.bambora.com: select the intended merchant, open Payments, and find the payment by its ID, reference or order ID. Inspect its status and event list. If a fallback capture is required, use Capture under the payment operations. See the separate merchant-portal instructions.
Use a fallback only for the matching authorized payment that has not already been captured. A provider-side capture may not update Sprii’s displayed state; do not repeat it because a Sprii order stage is unchanged.
A person with order access can start an eligible refund in Sprii; see Refund an order.
For classic ePay on Sprii’s standard checkout, the shopper opens the payment window from customshop.sprii.io. Register sprii.io under Settings > Payment system in ePay; its domain rule approves subdomains when their parent is registered. If your Page uses a custom checkout domain, coordinate it with Sprii. Complete the domain’s DNS and SSL setup before Sprii enables it on the Page. Confirm the payment-window domain and callback routing with Sprii, then register that checkout domain’s parent in ePay before accepting payments. Sprii sends return and callback URLs with each payment; do not copy callback addresses from the old article into ePay settings.
Classic ePay controls API/web-service server access under API/Web services > Access. For this Sprii connection, ask ePay to remove the static IP restriction; do not register your computer’s or another platform’s IP. Confirm the provider has made that access change before relying on capture or refund.
The pictures show editable, unsaved forms. Empty credential fields and the example Title do not demonstrate a configured payment method. The retired Bambora payment alert is not part of these steps. Saving ePay settings does not verify all credentials.
These settings belong to the selected Page. Existing campaigns use the current method and title when checkout loads, and new payments use current credentials. Saving does not rewrite an issued payment link. Changing credentials or merchant account may prevent capture or refund of earlier payments.
Need help? Contact Sprii Support